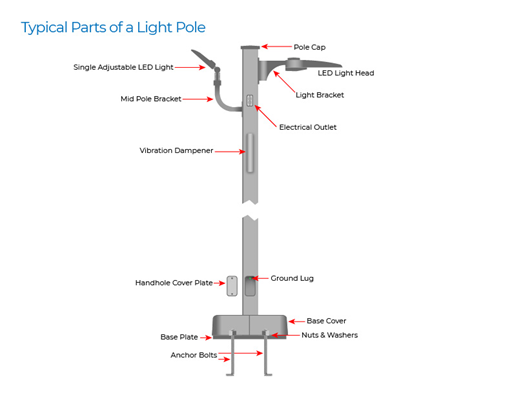
What are the components of a light pole?
There are two types of light poles, Anchor-based and Direct Burial. Anchor-based poles are attached to a concrete foundation with anchor bolts, nuts, and washers. Direct Burial or embedded poles get installed by inserting the shaft into the ground without a concrete base or anchor bolts. Most poles include a hand hole cover and a pole cap. The hand hole cover allows electricians to make connections, maintain internal wiring, and replace if damaged. Pole caps are also replaceable and are only necessary if the lights are on the side of the pole. A pole cap is unnecessary if you have a bull horn bracket mounted on top of the pole.

What Size Anchor Bolts Do You Need?
For a typical 20ft pole, your anchor bolts should be ¾ inch in diameter and 17 inches long with a 3-inch j-hook. Measurements for the anchor bolts can vary depending on the location, wind conditions, soil composition, weight on top of the pole, and pole height. For example, 30-inch long bolts are typically used if you are going above 20ft. If the pole is 30-40 feet high, anchor bolts 1-inch in diameter by 36 inches in length are recommended.
Additional Light Pole Components
Several other parts may be required, depending on the project. For example, if you intend to attach security cameras to the light pole, you may consider installing a vibration dampener to minimize shaking the camera. Some look like pole caps; others connect to the side of the pole; they are necessary because they absorb the harmonic cycles in the post. Vibration dampers are essential for poles installed in areas prone to constant breeze to minimize the harmful effects of vibrations and extend the pole’s lifespan.
Another component worth looking at is the pole side brackets. Side brackets are added to the side of light poles to add additional lights to light up different areas, such as the building facade.
If you are installing new light poles, there are two other optional components to consider. Electrical outlets and brackets to hang banners. Electrical outlets can serve many purposes; the primary use is powering Christmas lights and other holiday decorations while eliminating the need to run additional wires to and from the pole. Banner holders for vertical hanging banners allow you to advertise local events. Both the banner brackets and outlets are optional accessories to provide added value in municipal and commercial applications.
What is a light pole tenon?
A Light Pole Tenon is a cylindrical component attached to the top of the pole allowing a light or pole bracket to be easily installed. Most tenons are 2⅜ inches in diameter; larger diameter tenons, 3 and 4 inches are available depending on the application and load requirements. If the light pole does not have a tenon or its orientation needs to be changed, you will need to get an adaptor. Light pole adapters are used to add a tenon to a pole or change the tenon’s diameter, direction, and shape. There are different tenon adapters to choose from depending on the lights and attachment angles. For example, you may need a single tenon to add on top of a square or round pole, or you may already have an existing tenon but want to use an adaptor to attach horizontal lights. Most tenons are used to attach Bullhorn Brackets or Spoke Brackets.

How do you install a light pole?
Once you’ve determined all the required and optional parts you want to use with your light poles, you’re ready to begin installing. Properly installing a light pole can be complicated; however, here is a simple way of breaking down the steps for each type of pole:

For anchor based light poles:
(Note: these steps are a high-level explanation. Always utilize licensed and bonded contractors for installations):
- Check if the city or municipality you are installing in has code or requirements and follow as needed for the foundation design. How deep you want to make the concrete foundation depends on soil and wind conditions and how much weight you have on the pole (i.e., light fixtures, attachments, etc.). See example
- After digging the hole, use the paper template (which comes with poles as a template) to drill holes in a piece of plywood. Ensure that the holes match the paper template to avoid alignment problems between the anchor bolts and the pole base plate.
- There should be four holes for anchor bolts and a larger hole (PVC pipe) in the center for the conduit.
- Support the plywood on top of the Sonotube (concrete form) column, ensuring it is level.
- Insert anchor bolts into the plywood with a single nut and washer (allowing them to dangle), ensuring they do not fall into the concrete form.
- Place rebar throughout the form and a PVC center and side pipe (for wires) into the foundation; pull wires through PVC center pipe.
- Slowly begin pouring concrete, making sure to vibrate, minimizing air bubbles. Curing time will depend on ambient temperature and humidity as well as foundation size.
- Place the pole on a set of sawhorses; install lights and optional accessories, this prevents going up on a ladder later to install.
- Once the concrete has cured, the pole (lights and accessories attached) is ready to be lifted into position and bolted to the anchor bolts in the concrete base.
- Ensure there is a nut and washer at the bottom and top of the base plate. Once again, the bottom ones are for leveling the pole as needed and the top ones for locking the pole in place (torque to specified spec).
- Bring the conduit wires up from the center and pull them out of the handhole. Your electrician can make the final connections to the conduit and install the handhole cover plate.
- Install the base cover in the bottom to cover over the anchor bolts and base plate.
For Direct Burial or Embedded Poles:
(Note: these steps are a high-level explanation. Always utilize licensed and bonded contractors for installations):
- Auger a hole that is at least 6 inches larger than the diameter of the pole. (Consult a foundation engineer for the proper design of the foundation, as explained above.)
- Lay the pole on the ground with the base next to the hole. Pull the conduit thru the center and out the handhole (tape in place to prevent it from falling back in). Stand the pole in the hole, ensuring the wire/conduit is not pinched. Start backfilling with proper material, tamping down as you go. In sandy soil conditions, use aggregate or concrete to backfill. In rocky soil, you can use the soil that was removed during excavation.
- Backfill slowly; this will allow you to level the pole, making minor adjustments as needed to ensure it is plumb.
- Once the pole is installed, your electrician can make the final connections to the conduit and install the handhole cover plate when finished.
Check out our YouTube channel to learn more about the assembly of a light pole and the individual parts. In addition, our custom installation gallery can help you in planning your next lighting project!
If you have any additional product-related questions concerning parking lot lighting, send us a message or call us at (800) 443-8254. We’d be happy to help!
